Do you notice anything missing in the photo above?
One of the other little changes I’ve made is to get some Powerline adapters so I can run my internet through the electric wiring in my house, rather than having additional cabling through my house. A much cheaper change than the other incremental improvements I’ve made recently, but such a difference.
Before this, I had a 15+m long RJ45 cable running from my modem to the other side of the house where my computer is. Although you can selectively ignore it, every time I vacuumed the vacuum cleaner would get caught up in it and often yank the modem out of the wall. Although I mostly photographed around it, you could see it in the background of many photos…
…or the foreground…
It photobombed many living room photos:
…on the left, just below the falcon chair
Like a horror movie villain, it was always lurking:
…it’s BEHIND you!
And it added visual noise and clutter:
During the great sewing adventures of 2016
One tiny change, and it’s so much more serene. I feel relaxed each time I walk into my living and dining room with that one tiny change:
As I cleaned the silverware from DIY Dad’s, I decided I would keep some and put it into circulation to get some use out of it: family history doesn’t have to be turned into museum level artifacts: it should be used. Particularly in the case of silver and silver plated items, because use helps prevent tarnish build up (tarnish build up means cleaning, cleaning means taking off tiny molecular layers of silver).
Aerial view: lacy coral on ancient dried seaweed, oyster shells and different coral.
Apart from the stuff from DIY Dad’s, I also helped clean my aunt’s house, where there were heavily tarnished silver-plated items that were from my Nana, which were not going to make the grade it terms of being kept: so I insisted I’d take them and clean them up.
Which I did: some I have given to my other aunt, some I have put in with the stuff I returned to DIY Dad and a couple of curiosities I have kept. Because they were curious and fun: they had potential.
Vintage egg coddler and footed cream jug (could be a gravy jug).
I had a couple of events at mine (especially another high tea with The Most Ladylike Lady, Molly’s Mum and The Editor-in-Waiting, you might know them from the High Tea: Slacker Cocktail Sponge Cakes recipe). And I knew The Most Ladylike Lady – being another Downton Abbey fan – would like it if I Downton-ised the decorations.
…what better way to Downton-ise something than to bring out the silver?
Sugar cube holder with spoon, and the vintage egg coddler (that was actually my mum’s)
It did look very refined – and what a day it was! It actually rained on this summer day, quite rainy.
Silver-plated pepper and salt shakers in the background.
The footed bowl was perfect for presenting Ginger Kisses (and would be perfect for presenting macarons too):
A very Downton centrepiece.
Not all the silver is ornamental (although I am using some of it that way in this staging), I got Nana’s siler-plated cake forks out for the Very Downton High Tea:
Mmmmm…cake….forks…
It’s quite fun to put this stuff to use, I don’t think it’s been used for at least 20/so years (if not more).
I popped into Ikea to replace two more of my Nisse Dining chairs. They are the cheap white folding chairs I had around my dining table:
Nisse and cakes…
I’ve already had to replace two in the time I’ve been at the house (the backs eventually break: you can’t repair them and they are unsafe to sit on), and I had to replace another two while also knowing that a third had started cracking…
So I popped into Ikea, to discover that:
I’d picked the worst weekend to go to Ikea: the new catalogue has only just been released
They didn’t have any white Nisse chairs in stock
Given I was having a dinner party that night, and I didn’t want to force everyone to sit on the plywood stools unless I really had to, I decided to rethink my seating in the dining room.
New chairs inspected by Her Majesty
So I left Ikea, having only purchased a brown toy rat for the Ginger Menace (he likes their rats), and hied myself to Gogo Furniture. Which conveniently just happened to be 3 left turns and a right turn away from Ikea.
Gogo Furniture stocks replica Mid Century designs as well as replicas of other iconic designs. After mulling over silver Tolix chairs, I decided on 4 replica Eames DSW chairs (fibreglass/plastic with the birch legs):
Very pretty
Ironically, these are the chairs I first considered buying for my dining table. when I first moved in. At that time I was trying to decide between: white Casala chairs, replica Philippe Starck Ghost Louis chairs, white Eames DSW replicas or white Eames DSR chairs (with the metal Eiffel base). Eventually I decided to go with the Nisse chairs: time and budget being two significant factors.
What goes around comes around, both in terms of design and house purchase decisions 😉
Another dinner date at mine, making use of the flowers and the tidy left over from The Ballerina’s dinner visit. One of this gang of 4, The Divine Miss K, had a wardrobe clean out and was sharing her bounty of shoes, jewelry and clothes with the other members of the gang.
The Divine Miss K is actually vegetarian, so I set myself the challenge of finding a roast vegetable dish that count take the place of a meat roast. So a roast dinner where a vegie dish takes centre stage as the hero. And as the 4 members of the gang do like French food, clearly it had to be a french food themed dinner.
But not just any stuffed pumpkin, a recipe based on a family recipe from a pumpkin grower in Lyon. The original recipe had bacon in it, but it is customisable: as long as you have bread, cream and gruyere plus the herbs used, you can go anywhere with it.
I choose a pumpkin that fit perfectly into a cake tin, which was perfect: you do need something to contain any juices in case they overflow, but you don’t need a proper pan or anything. Just cover the bottom of the tin with baking paper, as if you were baking…a cake.
Pumpkin preparation
You have to cut a lid and then scoop out the “innards”, so all the seeds need to go.
To cut of the lid, use a sharp kitchen knife and gently stab down at about a 45 degree angle into where you want the lid. I found it almost impossible to cut at this angle, so you will need to keep “stabbing” down to mark out your lid and cut through the flesh until you have cut all the away around.
This pumpkin is…stuffed.
The lid will likely still be attached via the seeds, so as long as you have confirmed you have cut the actual flesh (by this point you’ll be able to run your knife around the lid), switch to a butter knife and use it to lever off the lid, working around the lid like it’s a paint tin.
Once that’s done, you need to scoop out the seeds and fibres attaching them to your pumpkin. I don’t have a history of Halloween pumpkin carving to inform me, so…I started with a serving spoon, down graded to a soup spoon and then finally got in with my hands. The soup spoon will allow you to cut through the fibres, but pumpkin seeds are tricky, slippery little suckers.
Even though it’s only a vegetable, that part of the prep actually made me squeamish.
Pumpkin dutch oven.
Ingredients
Serves ~4 with lots of pumpkin for leftovers, but not much filling. If you plan to serve 5-6, you could do it but you will need to dish out the filling equally to everyone’s plates and then start spooning out the pumpkin. The epicurious recipe may look like you can cut it in slices, good luck with that: you’d need a firmer filling that what this recipe provides.
Pumpkin (22 cm in diameter)
100-200 grams of bread, cut into 1.5cm chunks
100gms gruyere, cut into 1.5cm chunks
3 garlic cloves
1/4 cup fresh chives: finely sliced
1/4 cup spring onions: finely sliced
1 tbsp fresh thyme
1/3-1/2 cup double/thick cream
1/4 cup pepitas
A pinch of nutmeg
Salt and Pepper to season
Preheat the oven to 180°C.
Toss everything – barring the cream and nutmeg – into a bowl and stir well. The recipe tells you to pack this into the pumpkin, mix the cream and nutmeg together and then pour in. I found the thick cream I had to work with, too thick, so I mixed the 1/3 cup into my bowl too, along with the nutmeg.
Then I stuffed the pumpkin with this bounty. It was quite easy spooning out the wet mix into the pumpkin with my trusty serving spoon. I used the lid to press it down to fit all the mix in, then poured a little bit of cream over the top of the opening and let that settle into the pumpkin.
Pop the cap on the pumpkin, then pop the whole thing into the oven for ~2 hours (mine ended up being in the oven for 2.5-3 hours due to timings of arrivals and entree).
You can use a skewer to test how well the pumpkin is cooked, from the outside. When there’s give, it’s cooked (but do make sure it is being evenly cooked in your oven).
Because I cooked my pumpkin in a springform cake tin, it was easy to open the sides and then slide the pumpkin carefully onto a platter. At that point you are dealing with a slightly soft, rather heavy and incredibly hot unwieldy behemoth. So make it easy on yourself, try not to set up a situation where you have to lift it onto anything. Sliding is much easier on you, and your pumpkin.
Pumpkin on the table.
Serve with broccolini, green beans and asparagus, quickly cooked and drizzled with olive oil. And ribbon sliced purple carrots fried with shallots, butter and parsley.
Main course.
This dinner was epic. The dessert, supplied by the Baking Queen, was a a rum chocolate mousse. I will see if she will let me feature that recipe on here.
Off dessert, back to the sides.
As mentioned, this does serves ~4 with lots of pumpkin for leftovers, but not much filling. If you plan to serve 5-6, you could do it but you will need to dish out the filling equally to everyone’s plates and then start spooning out the pumpkin.
Plated.
If you have pumpkin leftovers, spoon it out from the vessel and then turn it into soup. It’s delish 🙂
The Ballerina finally returned from a sojourn over east, where she celebrated a significant birthday far from many friends but close to her family. Even though the birth date has most definitely been and gone, the occasion was still going to be marked with a catered dinner (and some slighly singed Naan, but we’ll get to that).
Plus as you know: I love an excuse to buy cut flowers and “decorate”.
“Decorated”
The menu was Kitchari (and Ayurvedic Indian rice dish) and Tandoori roast lamb, with champage and rosé (to counteract any perceived Ayurvedic benefits, clearly):
On the chargrilled Naan incident of 2015: I blame my oven, and my inattention…I do not blame the champagne.
The naan and mini-pappadums were packaged, I just had to heat the Naan (which I slightly overachieved at) and pop the mini-pappadums in a bowl. Too easy
There was something missing…
Tandoori Lamb
I adapted a Tandoori Chicken recipe for this as follows…
Ingredients
Lamb mini roast
1 tsp salt
1/2 lemon
1 tbsp ghee melted
fresh coriander to garnish
Tandoori Paste
1/2 tsp garlic minced (from the jar)
1/2 tsp ginger minced (from the jar)
1 tbsp ground paprika
1 tsp ground cinnamon
1/2 tsp ground coriander
1/4 tsp chilli powder
pinch ground cloves
a cup of greek yoghurt (natural)
Tandoori Past instructions: Mix in a bowl, this will make enough for you to roast a Tandoori Chicken and roast a lamb mini roast, store the mix in an airtight jar and use in 3 days.
Make thin cuts all over the lamb, rub the lemon half over it and then rub salt into the cuts. Put the lamb in a covered bowl (ceramic or plastic, not metal), and refrigerate for 4 hours at least (ideally 24 hours).
Preheat oven to 200°C. Pop lamb in a tray, drizzle with the melted ghee and then roast for 60 minutes. Remove lamb from oven, turn oven up to its highest setting.
Remove from lamb temporarily from the roasting pan: drain any juices from pan. Return lamb to pan, then roast for a further 20 minutes at highest heat. Rest for 10 minutes, serve garnished with coriander sprigs.
On the lamb.
Almost Kitchari
It’s almost kitchari because I was supposed to include lentils, and I forgot the lentils.
Ingredients
1 tbsp ghee
2 tsp grated ginger (from a jar)
2 tsp garlic (from a jar)
3 cloves
1/2 tsp cumin seeds
1 bay leaf
1 green chili, deseeded and sliced finely
1/2 sweet potato, chopped in to 1cm pieces
1/4 cup frozen peas
1/2 cup basmati rice
1 1/2 cups water
1/2 tsp vegeta vegetable stock powder
1/2 cup tinned lentils, drained (if you want to remember to include them)
1/4 cup yoghurt to serve
2 tbsp fresh coriander leaves to garnish
Heat ghee in a saucepan on low heat, add ginger, garlic, cloves, cumin seeds, chilli and bay leaf. Heat for a minute or until fragrant.
Add the sweet potato and stir thoroughly to coat in the spices. Then add the rice, water and stock powder. Stir to ensure everything’s evenly distributed, then bring to the boil.
Reduce the heat, cover and simmer without stirring for 15 minutes.
Then add in the frozen peas, stirring through, and cover again. Remove from heat and leave to stand for 10 minutes. Then gently stir through the lentils.
Serve topped with dollops of yoghurt and sprinkles of coriander.
Almost Kitchari
Apologise for charring the naan again, then serve…
And don’t forget to take some filtered photos, otherwise the event never happened.
It was The Most Ladylike Lady’s birthday a couple of months ago, and due to an unfortunate alignment with her Mother’s Day, family birthdays, family holidays and more commitments, the little group of ladies we’re part of (The Most Ladylike Lady, The Editor-in-Waiting, Molly’s Mum and your humble writer) didn’t get together to celebrate until ~ 2 months later.
Pretty punctuation.
But I have to say: we may not do it immediately, but when we do celebrate: we go a little all out. You might even say: we bring the fancy.
It all started with a couple of flowers, and a cake…
And then…
Then…there were a couple of flowers, and two cakes!
And THEN:
Then…there were a couple of flowers, two cakes, a platter of sandwiches and a bowl of just warm scones plus champagne all round.
Yes: we bring the fancy. So apart from cleaning, arranging flowers and making the Women’s Weekly Rose & Almond Syrup Cake (from their Indulgent Cakes book):
Rose & Almond Syrup cake meet Dear Reader. Dear Reader meet Rose & Almond Syrup cake. Now that the introductions are over, Dear Reader you missed a deluxe cake.
And frantically cleaning, polishing, vacuuming and arranging flowers (I do confess: I invite people over as an enforced regime of tidying my house, and to justify occasionally splurging on cut flowers):
Flower arranging, recycled bottle style.
I assembled two variations on the Cream Victoria sponge, that I adapted from a Cocktail Recipe book.
Slacker Sponge Close Up!
And this recipe is so simple, I am almost embarrassed to call it a recipe.
Technique and Ingredients
2 slabs shop bought sponge cake
Raspberry Jam (I recommend Bonne Maman)
Leftover Creme Fraiche
Lemon Icing (Try Martha Stewart’s Lemon Drizzle): if you have icing sugar mix and a lemon: you can make this.
One fresh raspberry (or other berry) per portion
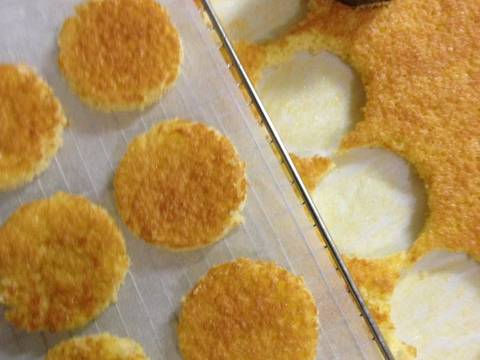
Lets start by talking about portions, the recipe I found calls for you to cut little circles of sponge and then turn them into a sandwich. The reservation I had about this is wastage: for every 4 perfect circles, you’d have this weird bit with 4 circular divots cut out of it.
See: weird bits with divots in them
My parsimonious and economical Australian grandmother, who grew up during the depression, did not bring me up to cut circles of sponge and leave behind perfectly cake. Oh no: Nana definitely did not bring me up that way. There will be no cake wastage in this household.
Solution: cut the two slabs of sponge into perfectly matched rectangles. I would have gone squares, but I was worried about crumblage at the edges (new word: crumblage). And crumblage means wasted cake. And you know what Nana would say about cake wastage!
Sponge glorious sponge…
Then for half of the sponge pairs, slather over a generous layer of raspberry jam. For the other half of the pairs: a generous layer of raspberry jam and a generous layer of creme fraiche (it’s like a French Queen Victoria Sponge).
Drizzle lemon icing over both, and top with a fresh berry. Et voila: on one platter, you have two variations of a sponge!
More pretties
FYI: the sandwiches were egg and spring onion, and chicken, walnut and apricot. They were delish, I will see if the Editor-In-Waiting will let me share the recipes. And I will try and get both the recipe and technique of the perfect scone out of Molly’s Mum. She can take 3 ingredients and turn out sconderful wonder, I take the same three ingredients and turn out…little pellets of hard.
So it hasn’t been all pruning, guttering, sorting and clearing on my hols, I have taken some time to do some “pretty” things too. I finally found a couple of Alocasia plants (classic mid-century indoor plants that have had a bit of a revival) as well as a split leaf Philodendron (or as we call them: Monstera Deliciosa) plus I layered some String of Pearls plant that The Coffee Fairy gave me several years ago and repotted my Spathiphyllum (Peace Lily) into indoor pots and bought a different variety Spathiphyllum to mix it up.
So now I have a couple of indoor vignettes that are making me happy, like the Alocasia on my bedside table (the Phaelonopsis Orchid stopped blossoming as it’s winter and has been relocated, as you will see):
Sexy bedside table…
The pebbles to the right of the Alocasia were gathered on the beach of Port Lligat in Spain (where Salvador Dali lived most of his life), those on the left were from other holidays during the years: Queensland, Brighton Beach (UK)…
I played around taking pics of the String of Pearls plant, vessel, shell (have had that for about 30 years) and Great Aunt Eileen’s Ginger Jar on the window sill:
Whited out.Less saturated with light
The Phaelonopsis Orchid is hanging next to the fireplace with the Monstera Deliciosa:
Very Retro
The stones in front of the plants were picked up off the beach at Figueres, in Spain. They are actually bricks that have been worn down by the sea: tumbled around and worn away by the waves and the tides, and beautiful because of that.
Over in the dining alcove, there’s another String of Pearls plant and one of the repotted Peace Lilies:
Just hanging out…
They balance out the ceramic white apples I found on sale (still on the white ceramics kick):
Simples…
And there’s another Alocasia by the door, it’s hanging with the brass statue two of my besties bought me back from Bali (I haven’t mentioned them before, we’ll call them The Writer and the Jedi Knight), and the fancy turquoise mosquito coil holder I bought over summer:
Not one but TWO Alocasia in da house…so happy right now.
aka: Herbal Harvest…of the responsible home owner kind…
Close up of the sage, early stages of drying
4 days of Easter long weekend, meant 3.5 days of catch ups, movie watching, book reading, sleeping in and other fun stuff…and 0.5 days of work in the garden. One thing I did do in the 0.5 days of garden work was prune my Kaffir Lime, Sage, Bay Trees, Mint (Vietnamese and Common) and Rosemary.
This meant my dining table has been designated as household herb drying and prep area. I have Vietnamese Mint sprigs in a vase to see if they shoot (in which case I will plant them and donate them to other garden-minded souls).
As well as sage leaves drying on a cake rack:
Sage drying on a biscuit/cake rack
I had to brave the thorns of the Kaffir Lime branches to strip the leaves and the fruits, something that could be done on the rug while watching TV thankfully.
Kaffir Lime Leaves, ready to be detached from branches
Now I can use the zest of the limes and freeze the leaves.
Kaffir Limes to the left, Leaves to the right
Each of the leaves I am either freezing or drying has been washed and then individually patted dry with a paper towel. My workmates got most of the Kaffir Lime Leaves from this batch (I do have a container in my fridge for moi), but the sage leaves I am keeping for myself:
Another look at the sage leaves
Will be waiting another week for the bay leaves to dry. There are huge amounts of them:
Two trays of bay leaves to every one tray of sage
I had so many bay leaves, one cake rack was not enough (neither was two), so I used a dish drying rack covered in news paper and then paper towels to hold the overflow:
Un-Bay-lievable
If you want a pack of home-grown bay leaves, each pruned and individually towel dried by me, speak now…
Pruning the harbingera so it doesn’t throttle the bamboo and training the remnants to cover the rest of the fence
There were a couple of offcuts from my pruning, so I created a table decoration with it:
Bananas from IGA, lemons from my back garden, fruit bowls from Target and metal jug from a thift shop with hardingera from the front gardenTaking it from the topA different perspective
Two punnets of watercress planted into some matching celadon coloured glazed pots that I had hanging about, makes a cheap functional centrepiece for dinner with the gals.
Functional and aesthetically pleasing
By day the two pots of watercress live in a deep saucer which is always topped up with water – keeping them lush, healthy and incredibly abundant. By night they get put into the matching celadon coloured saucers and dragged inside to be a simple centrepiece when entertaining: